The server in which the caching task is created is
the master caching node(TileMaster), the other cluster child nodes are
child caching nodes(TileWorker). Preparation of the caching environment
and storage, operations like creating task and monitoring, both are done
on the master node, and there is nothing to be done on the child nodes.
After the caching task is created, the data to be cached will be deployed
on the child nodes automatically. If the data on the master node is changed,
it will be automatically synchronized to the child nodes. About the principle
and internal communication mechanism of the distributed tiling, please
refer to: Distributed
tiling mechanism .
Create distributed tiling task and set parameters
- For raster tile cutting: Access the service
manager WebManager of the tile cutting main node, then click on "Cluster"
and "Tile Management" in the navigation bar to enter the
tile management main interface. Click "Select Service" and
then choose the map or image service to be cut, return to the tile
management main interface and click the "Generate Map Tiles"
button for the layer, and set the tile type, tile scale, and other
parameters.
- For vector tile and attribute tile cutting:
Access the service manager WebManager of the tile cutting main node,
and click "Switch to Old UI" to enter the old service manager.
Click "Cluster" and "Distributed Tile Cutting Service"
in the navigation bar, then click "Create Tile Task", select
the service component and map to be cut, and set the tiling type and
scale scheme, etc.
The specific setting details are as follows:
General settings
General settings mainly include three parts: tile setting,
storage setting and scale setting.
Tile settings:
- Tile Type: Used to set the type of tile generated.
Currently, three types are supported: raster tile, vector tile, and
attribute tile (obsolete). The raster tile tills the whole map by
default, and the tiling result is a picture in raster format. The
vector tiles and the attribute till one or more vector layers specified
in the map. For detailed information on tile type and format, refer
to: Tile Format .
- Tile Size (pixels): The size of each tile generated,
in pixels. The supported sizes are 256 * 256, 512 * 512, and the default
is 256 * 256.
- Tile Bounds: Used to set the geographic range
for tile generation, such as -180, -90, 180, 90. The default is the
full extent of the map.
- Tile Origin: Calculate the starting coordinate
point of the tile row and column number, which is the upper left corner
of the tiling range by default. The standard tile is based on the
origin defined in the standard:
- The default origin specified by the MBTiles
standard is the lower left corner of the globe
- The default origin specified by the GeoPackage
standard is the upper left corner of the maximum range of the current
map coordinate system. For example, when the map coordinate system
is WGS1984, the default origin is (-180.0, 90.0)
- Resolution (DPI): The resolution of the tile,
in pixels, 96 by default.
Note: If the storage type
is selected in GeoPackage format, the till-to-scale automatically changes
with the tile size.
Storage settings:
- Storage Type: Specifies the storage type of
the generated tile. For details, please refer to: Tile
Format .
- If the selected tile type is raster tile, the
supported storage types are MongoDB, OTS (obsolete), SMTiles, MBTiles,
UGCV5, and GeoPackage. Note that image services tills only support
UGCV5 and MongoDB storage types.
- If the selected tile type is vector tiles,
the supported storage type is SVTiles
- Storage Path: The storage path of the generated
tile. When the selected storage type is SMTiles, UGCV5, MBTiles, GeoPackage
and SVTiles, the default value of the storage path is the default
output path (output) of the current product package. For detailed
information, please refer to the: Tile
Format .
Note:
When the selected storage type is SMTiles, it cannot be stored in the
mounted shared directory.
When
the selected storage type is UGCV5, you can also store cache files in
the S3 object storage service. At this point, the storage path needs to
be filled in as {Endpoint}/{bucket name}/{specified file path}/? accessKey={Access
Key ID}&secretKey={Secret Access Key}, For example: http://oss-cb-beijing.aliyuncs.com/iServer/test/?accessKey={Access
Key ID}&secretKey={Secret Access Key}
Among them,
- Endpoint: The terminal node is the area domain
name of the object storage service in different areas, which is used
to process the access requests of their respective areas. Such as
http(s)://obs.cn-north-4.myhuaweicloud.com
- bucket name: The name of the bucket you created
- specified file path: The file path within your
bucket to hold the tile
- Access Key ID: Access key ID. Unique identifier
associated with the private access key
- Secret Access Key: The private access key used
in conjunction with the access key ID
- Storage ID: Identification of the distributed
storage location. When the selected storage type is and MongoDB You
need to select the ID of the distributed tiles storage that has been
created. If the storage location has not been created, add distributed
tiles storage.
- Storage Format: When the storage type is UGCV5,
the parameter is available. The UGCV5 tiles format includes the original
and the compact. When the tile storage type is the original type,
the tile file is stored on the disk in a separate image file format,
and the data is not compressed and can be read directly. The map tiles
data is visually represented as raw images in multiple folders. Compact
tile uses a certain compression and encryption mechanism for the original
tile file, including two parts: index file (*.sci) and tile data.
The tile data uses a set of files to replace the original format in
structure, and the tile data under different scale folders will be
stored as a set of files (*.cf). Compared with the original type,
the compact storage method has the following advantages: the number
of files is reduced, which is beneficial to the transmission and copying
of a large amount of tile data; the time consumption for cache creation
is reduced; and the data is supported to be encrypted. Please note,
iServer only supports storing tile files in the raw UGCV5 format to
the S3 object storage service.
- Tileset Name: when the storage type is UGCV5,
you can also set the name of the generated tile, corresponding to
the name of the folder where the tile is stored, which is consistent
with the map name by default. When "Configure this map service"
"is checked, it cannot be modified and is consistent with the
map name.
Scale
bar setting:
- Scale Setting: Used to set the way of tile
scale bar. The scale options are:
- SuperMap Cloud/Google Maps/Bing Maps, maps
that only support the Web Mercator coordinate system (EPSG Code: 3857)
- Tianditu, only supports maps in WGS 1984 (EPSG
Code: 4326) and Web Mercator coordinate system (EPSG Code: 3857).
Tianditu defaults to a scale of 2-18, and you can choose according
to your need.
- GeoPackage Scale, the scale scheme used when
the storage type is GeoPackage. This scale scheme includes selectable
scales from 0 to 20 levels. The 0th level scale is the scale that
displays the maximum range of the current map coordinate system in
a tile (default is 256 * 256 pixels), and the scales of other levels
increase by 2 times on this basis. The scale scheme varies with the
coordinate system and tile size of the map.
- Global Scale. The global scale has levels from
0 to 25. Adding or deleting fixed scale levels is not supported.
- User Defined Scale, where you manually enter
the scale as needed
- When cutting a WMTS map service, you can also
specify a tile matrix set scale scheme for cutting, such as GlobalCRS84Scale_China.
When using a matrix set scale scheme, it does not support adding,
deleting, or modifying scale information.
Please note:
Since the WMTS service does not contain coordinate
system information itself, only after specifying a tile matrix set does
the map contain coordinate system information. Therefore, when generating
tiles for the WMTS service, selecting SuperMap Cloud/Google Maps/Bing
Maps and TianDiTu scale solutions is not available.
Among them, the specific scales in the SuperMap Cloud/Google
Maps/Bing Maps scale scheme and the Tianditu scale scheme are:
Table 1 Scale Level
| Level |
Scale |
Level |
Scale |
Level |
Scale |
Level |
Scale |
| 0 |
1/591658710.9091312 |
5 |
1/18489334.71591035 |
10 |
1/577791.7098721984 |
15 |
1/18055.9909335062 |
| 1 |
1/295829355.4545656 |
6 |
1/9244667.357955175 |
11 |
1/288895.8549360992 |
16 |
1/9027.9954667531 |
| 2 |
1/147914677.7272828 |
7 |
1/4622333.678977587 |
12 |
1/144447.9274680496 |
17 |
1/4513.99773337655 |
| 3 |
1/73957338.8636414 |
8 |
1/2311166.8394887936 |
13 |
1/72223.9637340248 |
18 |
1/2256.998866688275 |
| 4 |
1/36978669.4318207 |
9 |
1/1155583.4197443968 |
14 |
1/36111.9818670124 |
19 |
1/1128.4994333441375 |
- Tile Scale: The scale level used to generate
tiles. You can select a scale level in the scale list, click the edit
button behind it, enter the denominator of the scale in the text box,
and then click the "√" button to confirm the editing. You
can also click the button to select "Add Scale" to add the
scale bar hierarchy in the scale bar list, or select "Default
Scale" to restore the scale settings. You can also select a specified
scale by clicking on the scale hierarchy, or select all or deselect
all scales. And click the "Delete" button to delete the
specified scale level. The recommended method for selecting a cutting
scale is to first confirm the scale or its closest value that the
client needs to use when accessing the map, and then set multiple
cutting scales so that the client can use map tiles when zooming between
multiple scales.
Set raster tile
- Tile Format: When
the tile type is a raster tile, the tile formats currently supported
include WebP (default), PNG, PNG 8, JPG, JPG_PNG mixed formats. If
PNG is selected and the number of current map color values is less
than or equal to 256, SuperMap iServer automatically saves images
in PNG8 format to save storage space. When the till map is an image
map, if transparency and image size control are required, it is recommended
to select the JPG_PNG mixed format. (
Note: WebP format is recommended for raster and image data, and vector
data is recommended for image tiling PNG format. )
- Tile Compression
Ratio: when format is When JPG and JPG _ PNG are mixed, you can set
the compression ratio of the picture. The setting range is (0, 1.0,
and the default is 0.75. The smaller the compression ratio, the smaller
the tile footprint, saving storage space.
- Transparent Background: When tile type is raster
tile, the background of tile is transparent. If checked, the generated
map tiles background is transparent; otherwise, the original background
color of the map is retained. When choosing For WEBP, PNG, and JPG_PNG,
the background transparency defaults to Yes.
- Configure this map service: Only map services
published by iServer are supported for slicing, which is not checked
by default. If checked, the tile storage path will be changed to the
"Output Path" set in "Global Settings" and cannot
be changed. The map tiles in the directory will be used by the map
service after the map cache is enabled.
- Enable Data Pre-processing: Checked by default.
If this option is checked, the distributed image tiling service will
preprocess the data after the image tiling task is started, and then
till the image. The default number of rows and columns is 50 * 50,
which can be set in "Data Preprocessing Settings". The parameter
is not supported by image services. Data preprocessing mechanism:
- The data is divided into rasters by the set
number of rows and columns, and each raster is marked as having data
or no data.
- Through data preprocessing, the area without
data can be marked in advance for the task of tiling, and the area
can be skipped directly when tiling, so as to improve the efficiency
of tiling. The role of data preprocessing is particularly prominent
when the data irregularity is large and there are many blanks.
- The result of data preprocessing is automatically
saved in the config file (【SuperMap iServer installation directory】\webapps\iserver\WEB-INF\config\dataPreProcessResult\).
The result of each map is a file with the same name as the map. If
the set number of rows and columns is the same as the existing processing
result, the existing result will be automatically reused, otherwise
the new processing result will automatically overwrite the previously
saved processing result. If you want to delete the preprocessing result
of a map, you can directly delete the config file with the same name
as the map.
- Perform md5 verification on data: Not checked
by default. If this option is checked, the data of the tiling node
and the data of the master node will be pushed Verification in md5
mode. If not checked, judge whether the data is the same according
to the file name and size. Compared with the comparison of file name
and size, md5 verification is more rigorous and reliable, but the
verification time is longer.
- Whether to enable timing tiling: If yes is
selected, the tiling time period can be set and added. Note:
image services does not support scheduled image tiling.
Set vector tile
- Whether to include attribute: set whether to
include attribute field in vector tiles.
- Thinning tolerance: Thinning the line and face
features in the vector layer according to the tolerance value set.
The unit is pixel, the parameter type is integer number, and the default
value is 0. If you set a thinning tolerance, the graph will be till
according to the Douglas-Peucker algorithm Algorithm) merges coordinate
sequences within a tolerance range to reduce the complexity of geometric
objects. Data thinning will reduce data precision and data volume.
Please set this parameter according to the actual demand of data.
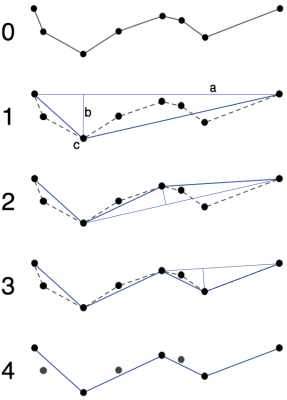
As shown in the figure above, the basic idea of the
Douglas-Peucker algorithm is to connect the first and last points of each
curve with a straight line (line a in Figure 1), find the distance between
all points and the straight line, and find the maximum distance value.
Dmax (i.e., line B in fig. 1), compare dmax to the tolerance D:
- If dmax is smaller than D, the middle points
in the curve will be deleted;
- If dmax is not smaller than D, it will keep
the corresponding point of dmax(point c in Figure 1), and divide the
curve into two parts by this point, then use above method for each
part.
- Layer: Select the vector layer that generates
the vector tiles. If the maximum and minimum visible scales are set
in the current map, select the layer under the scale that meets the
conditions.
- Expansion pixel: Expand some pixel around the
tile and then clip the features, the smallest value is 2, and the
default is half of the feature width such as half of the point diameter,
half of the line width, half of the region boundary width. This setting
can avoid repeated tile edges created.
- Attributes: Attribute fields included in vector
tiles, all the attribute fields by default.
- Query attributes: Attribute fields which are
supported to keyword query in vector tiles.
Add tile version and append tile
After setting the above parameters, click the "Create"
button to create the task.
If there are already map tiles with the same map name,
tile size and transparent in the storage location specified by the above
parameters, that is, the same file name of a single machine (such as *.smtiles)
or the same tile set name in the same tile library, the following two
situations will occur:
- For the tiles stored in a single computer such
as SMTiles, MBTiles, UGCV5 and SVTiles, it will add the tiles in the
same tile file(*.smtiles), overwrite the existed tiles in the same
position, or add new tiles.
- For distributed stored tiles, the system will
prompt: In the tile library, "This tile set already exists in
the tile library. Do you want to create a new version or append the
tile to the existing version? " , you can:
- If You need to select a "Create New Version"
tile in an existing tile set, the system will perform a complete tiling
on the data again according to your tiling settings.
- If you select "Append Tiles" in the
existing version, the system will till tiles for the data of the new
geographical range and scale according to your map tiling settings,
and append them in the existing tile version. If the current till
data is changed compared with the existing tile version, the system
will automatically update the changed tile.
For details about the version, please refer to: Tile Set Version .
View task list
After a task is created, you can click the "Show
Job List" button to view all the tiling tasks being exetilled and
completed on the current server in the "Tile Management" - "Task"
page, as well as the basic information and progress information of each
task.
You can stop the task being exetilled, start or delete
the suspended task, click the map name in the task to view more detailed
task information, progress information, work progress of each scale and
map tiling sub-node, and restart the task to till the map again.
For a completed task, you can view the map name, component
name, elapsed time, number of tiles, tile type, storage type, and storage
location corresponding to the current task.
For vector tile and attribute tile generation tasks,
after creating in the old UI, you still need to check the task information
in the old UI.
Monitor tiling process
In the caching task list, click the map name to view
the status information, including tile storage, tile configuration, task
progress(dynamically displayed caching speed, time), caching time statistics,
tile version, storage(occupied storage and expected occupied storage)
information. You can pause, start, restart the task, and monitor the status
of each TileWorker in the caching task.
For vector tile and attribute tile generation tasks,
after creating in the old UI, you still need to monitor the tile generation
process in the old UI.